Showing posts with label snack ideas. Show all posts

Saturday, July 23, 2011

Soaking my nuts...

Got your attention? hahaha

Yes indeed! I have started soaking my nuts!

So if you've read some previous entries you know the spark that finally lit my fire was terrible abdominal pain caused by gut damage and MSG exposures. So here I've been trying to eat clean, no more peanuts or peanut products, no more grains or soy, really trying to eat clean and start incorporating alot of primal/paleo eating ideals into my day to day life. Well I would notice I was still getting some abdominal discomfort after eating almonds. I bought raw almonds and still, bit of discomfort. I went back and read some emails from my friend and dear advisor and sure enough one of her old "gut damage" healing protocol emails suggested not eating nuts unless they had been soaked 4 to 6 hours. I did some reading and discovered that folks "soak their nuts" before eating them. I thought well what in the world is that for? I had a million questions, could you soak them ahead of time? did you have to soak them just before eating them? did they get mushy and soft? what was all this nut soaking about.

Then I came across this site http://www.thenourishinggourmet.com/2008/07/soaking-nuts.html and learned that you soak your nuts to weaken the enzyme inhibitors built into the nut which can cause digestive issues for those like me with gut damage. Apparently soaking the nuts can also help release beneficial enzymes. I figured what the heck, it's worth a shot.


So I purchased a package of raw almonds and put them in a mason jar filled with warm sea salt water (note here... don't use a mason jar... when the almonds swell the tapered top makes it a pain in the bootay to get the nuts out) I left the almonds to soak overnight, then emptied the jar into a strainer (with the help of a butter knife..lol) and rinsed the almonds, removing any lose skins that came off during the soaking process.


I then spread the almonds on a cookie sheet and placed them into the oven to dry. The lowest setting on my oven is 170 so just slightly above the recommended 150 degrees. We just might have to invest in a dehydrator.

I don't like to leave the oven on when we're sleeping or not home since we have a gas oven, so I dried the almonds in the oven until bedtime last night, then again this morning when we woke up, then after we returned from the farmer's market, on through the afternoon.


I ended up taking the almonds out of oven around mid-day because I was planning to roast a chicken to use for more bone broth so I decided to package the almonds in ziplock bags.  It was about this time I got the great idea to get creative.  I decided to put a little bit of olive oil in each bag with different seasonings and invited my husband to get in on the creative fun.  We came up with Southwest Chipotle Seasoning (Mrs. Dash), Dill weed, Cinnamon, Chili Powder and one batch of plain.  We put the seasoning into the bags and then massaged the seasoning and oil around all the almonds.  Once the oven had cooled from the chicken roasting, I created little dividers in the foil and returned the almonds to the oven for a couple more hours.

Once they were done drying and cooling I put them back into the zip lock bags and put those labeled zip locks into the freezer (since its my first time soaking and drying nuts I want to be sure that they don't have the chance to mold if I missed any moisture)  I am very excited about the different flavor possibilities and look forward to getting creative with our daughter and seeing what sort of flavor combinations she comes up with too.

Plus it's alot of fun to say "I'm soaking my nuts" :)   Enjoy

Snacks

So snacks are probably going to be a big part of our primal/paleo lifestyle. We are all pretty use to eating 6 small meals a day and while I know primal/paleo eating says to eat when you're hungry.. I have a feeling that we will continue to be healthy snackers. So I'm always keeping an eye out of snack ideas/options. Here are a few that we've tried so far. (Some of these end up being meals - ie: smoothies)

SMOOTHIES


Last weekend I had some spinach that I really needed to find a way to use. I purchased it with the intention of using it in salads, but with my abdominal discomfort I was trying not to eat raw veggies last week. My friend told me that blending them up should break down alot of the cell walls and prevent stomach pains from having them so I thought I'd make some fruit smoothies.

I secretly hoped my family might be feeling a little adventurous and try it too, but alas they voted for the more traditional fruit only version. haha

We blended banana, strawberry, spinach, vanilla coconut milk and ice to make some yummy fruitie smoothies.  They were very tasty and filling.  Our daughter couldn't even finish hers but did give it rave reviews (sans spinach).

Later in the week I also made a "Green Meanie" using the last banana, unsweetened kefir (not paleo but part of my gut healing plan) and spinach.  It was a light green color and tasted sort of like banana and yogurt.  It was pretty good and super filling.

Friday I made a blackberry and kefir smoothie which was very good except all the little blackberry seeds settled to the bottom and kept coming up my straw. Blackberries may not be the best smoothie fruit.  Might have to stick to eating those whole. haha!

KALE CHIPS

So I finally found Kale at the store week before last and last weekend finally got to try making Kale chips for the first time.  I found a video recipe on Mark's Daily Apple so I went about making Kale chips.  You take Kale, wash it really well, dry it well, then tear it into bite size (chip size) pieces.  You then coat it with a tbsp of olive oil, sea salt and whatever flavoring you like.  So I made that batch and it end up being SUPER salty.  Guess I got carried away with the Sea Salt, but the taste and texture wasn't bad so I thought I'd make up another batch this weekend.

 
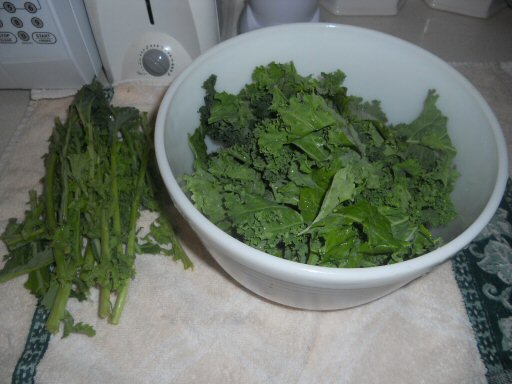
Step 1:  Break the kale off the bunch and wash the leaves well.  Make sure you really wash the kale well. If you are buying organic there are lots of little nooks and crannies.  If you are buying non-organic there is alot of room for pesticides etc on the leaves.  Scrub a dub those leaves as best you can.  I usually lay a couple of dish towels out on the counter and put the leaves face down on the towel to dry.  I will come back with another towel and pat them dry if I'm in a hurry, otherwise you could just leave them laying out for a while to air dry.


Step 2:  Once your Kale is washed and dried, you can begin pulling the leaves off the stems of the Kale plant.  They say to just tear it in chip size pieces with your hands.  I made two separate bowls out of my bushel of Kale so that I could try experimenting with a couple of different flavors.

Once you've gotten all the leafy parts off the plant you can add 1-2 tbsp olive oil to the bowl and massage it into the kale with your hands.  I used less sea salt this time since last time I over salted.  One batch I added lemon pepper seasoning to and the other batch I added chipotle seasoning (note: WAY to much chipoltle seasoning this time.. eekk)

Step 3:  Lay the leaves of Kale out on a cookie sheet (I like to cover mine with foil for easy clean up). You want the leaves to be laid out on the sheet so that each one can dry out.  I found it best if they aren't touching (I got lazy and put a bunch on one cookie sheet which just meant that it took forever for them to dry)

Step 4:  Put into a low temp oven to dry.  The video recipe said 200 degrees for something like 12 minutes.  I think she has a tiny oven because mine did better in a little bit higher temp over.  The low temp oven works fine, it just takes alot longer.  Check them after a while and short of shift them around, if the edges are still soft they need to dry longer.  They will be stiff and crispy when they are ready to come out.

Step 5:  Leave them to cool for a while on the cookie sheet.  Then you can enjoy them as a snack or I have found that you can keep them in a zip lock bag (left open) for a couple of days. They won't be as crispy as they are straight off the cookie sheet but it works well if you need some snack options throughout the week with no pre-time.


NUTS

The other night I thought I'd try soaking some cashews for a few hours and then drying them in the oven.  Well I think they mean to soak your raw nuts because when I soaked my roasted cashews, they got really soft.  So I put them in the oven to dry them for a few hours.  They never really did crisp up, either because they were already roasted or because I didn't leave them in the oven to dry long enough.  I wanted to snack on them.  Toward the end of the drying time in the oven I sprinkled some chipotle seasoning on the cashews.  That was pretty tasty.

(aside:  I occasionally have a square of 88% dark chocolate which I don't think is paleo but I read about it often on other blogs and sites so I've been incorporating it sparingly)


So when the nuts came out of the oven, I didn't want to wait for them to cool down or anything, I put them on to a paper-towel and decided to just throw a square of chocolate on top.  Chocolate and nuts, sounded like a pretty good treat to me.  Well by the time I carried my snack into the other room, the chocolate was an ewie gooey wonderful mess! haha! There was nothing civilized about it, but it was tasty.  There was to much to eat in one sitting so I got the idea that maybe I would take the rest of it and put it into the freezer, creating this yummy nutty chocolate treat.  So I put the leftovers in a plastic tupperware and put it in the fridge.  The next night I did indeed enjoy a very tasty cold chocolaty nutty salty/sweet treat. YUM!

More nuts... (I'm nuts for nuts)  see next blog